
WordPress migration is the process of moving your site, files, and database to a new hosting provider, and the biggest worry is downtime. A poorly planned move can interrupt visitors, lose new orders or comments, and break plugins or forms. The good news is that you can avoid noticeable downtime by building and testing the new site first, and switching DNS only when everything works.
This guide covers the complete WordPress migration process: preparation, backups, file and database transfer, testing before the switch, final data synchronization, and DNS changes. You will also find a post-migration checklist and the common mistakes to avoid.
Table of Contents
- What Is WordPress Migration, and Why Is It Important?
- What You Need Before a WordPress Migration
- How to Move a WordPress Site to a New Host Without Downtime
- How to Test Your WordPress Migration Before Changing DNS
- How to Synchronize Recent Changes in a WordPress Migration
- How to Switch DNS Without Interrupting Website Access
- Common WordPress Migration Mistakes to Avoid
- What to Check After a WordPress Migration
- Frequently Asked Questions
- Summary:
What Is WordPress Migration, and Why Is It Important?
A WordPress migration transfers an existing WordPress website from one hosting server to another while keeping its content, database, design, plugins, themes, and functionality intact. A typical installation has two parts, and a complete move needs both:
- Website files: WordPress core files, themes, plugins, uploaded media, custom code, and configuration files such as wp-config.php.
- The WordPress database: posts, pages, comments, user accounts, settings, and plugin data.
Copying only the files or only the database will not give you a working copy. The WordPress migration process generally means creating a backup, preparing the new hosting account, transferring files and database, configuring the new environment, testing, and then updating DNS. WordPress publishes official guidance on moving a WordPress installation to a new server.
Avoiding downtime matters because even a short outage can cost you visitors, form submissions, customer registrations, and orders. A careful WordPress migration protects four things:
- Website availability: visitors keep using the existing site while the new environment is built and tested.
- Customer activity and data: new database entries made during the move must not be lost in the final transfer.
- Search visibility: changing hosts without changing URLs is an infrastructure move, not a domain move, and Google advises preparing and testing the new host before you update DNS.
- Functionality: plugins, payment integrations, email, scheduled tasks, and caching can behave differently on a new server, so test them while the old site is still live.
What You Need Before a WordPress Migration
Before you start the WordPress migration, collect the access and information you need from both hosting providers.
Access to your existing hosting account
For the WordPress migration, you need to download files, export the database, and review the current setup. That usually means cPanel or another control panel, File Manager or SFTP, phpMyAdmin or database export access, WordPress administrator access, your current DNS configuration, and your email account and mail-routing details.
A new hosting account
Prepare the destination account before the WordPress migration starts, and confirm that it supports your site. Check the PHP version and required extensions, MySQL or MariaDB support, storage and memory, file permissions, SSL support, and SSH or SFTP access where needed. If your site relies on specific caching software or server-level settings, confirm compatibility first.
A complete WordPress backup
Create a fresh backup of both the files and the database. They are separate components, so downloading your WordPress folder does not download the database. Store the backup outside your existing hosting account so you have a recovery copy if something goes wrong. Our website backup guide shows how to back up before a WordPress migration.
Access to your domain’s DNS settings
You will need the DNS provider or registrar that manages your records, so you can update the A record or nameservers when the new site is ready. If email is hosted separately, note your MX, SPF, DKIM, and DMARC records before you change anything.
How to Move a WordPress Site to a New Host Without Downtime
The safest approach is to build and test the new site while the original keeps serving visitors, and to switch DNS only after the new site is confirmed ready. In practice the WordPress migration has eight steps: prepare the new account, back up the files, export the database, upload the files, import the database, test, synchronize recent changes, and switch DNS. The first five are below, and the rest have their own sections.
Prepare the new hosting account
To begin the WordPress migration, activate the new plan, then create the website folder, a database, and a database user. In cPanel you can do all of this from the control panel. Before you upload anything, verify that the domain is added, the document root is correct, the needed PHP version is available, the database can be created, the server has enough resources, and HTTPS can be used. If you are moving to a different environment, this is also a good time to review storage and memory needs.
Back up your existing WordPress files
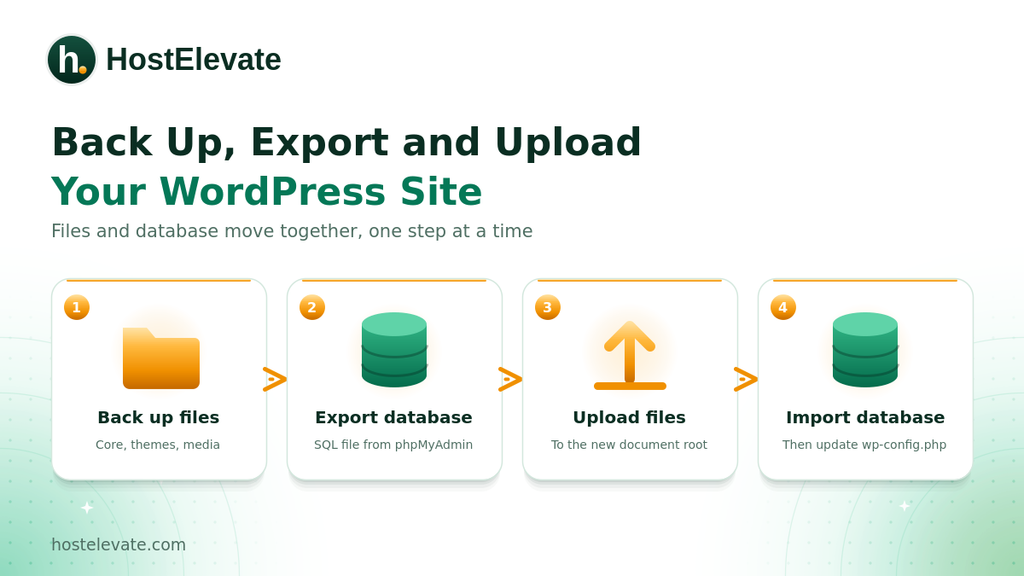
Create a complete copy of the installation. In cPanel File Manager, find the site folder, usually public_html or the document root for your domain, then download or compress WordPress core files, the wp-content folder, themes, plugins, uploaded media, custom configuration files, and any hidden files. The .htaccess file in particular can hold important rewrite rules. Keep this backup unchanged until the move is finished and verified.
Export the WordPress database
In cPanel, open phpMyAdmin, select the database your site uses, choose Export, select SQL format, and download the file. If you are not sure which database belongs to the site, check wp-config.php, where the database settings look like this:
define( ‘DB_NAME’, ‘database_name’ );
define( ‘DB_USER’, ‘database_user’ );
define( ‘DB_PASSWORD’, ‘database_password’ );
define( ‘DB_HOST’, ‘localhost’ );
These are examples only. Never publish or share real database credentials.
Upload your website files to the new server
Upload the compressed backup to the new account’s document root and extract it, then confirm that wp-admin, wp-content, and wp-includes are in the expected place. Avoid extracting into an extra nested folder, because the site should sit directly in the document root rather than in something like public_html/backup/wordpress/. If you use SFTP, confirm the upload has finished before you continue.
Import your database and update the configuration
The new account needs its own database and user. In cPanel, open MySQL Database Wizard or MySQL Databases, create the database and user, assign privileges, then open phpMyAdmin, select the new database, and import the SQL backup. Check that the expected WordPress tables are present. Then update wp-config.php on the new server with the new database name, user, and password. The database hostname may not be localhost on every provider.
If you keep the same domain and URLs, you normally do not need to change the WordPress site address. Still check file permissions, PHP version and extensions, .htaccess rules, the home and site URL settings, plugin and theme compatibility, and upload and memory limits. If you are also changing the domain or URL, that is a separate migration that needs URL replacement and redirects. Use a serialization-aware tool such as WP-CLI search-replace, because basic search-and-replace can damage serialized data, and never change the guid column.
How to Test Your WordPress Migration Before Changing DNS

Testing is the most important stage of a WordPress migration. Do not point your domain at the new server right after uploading. Test it first while visitors keep using the original host. You can use a temporary preview URL, a staging environment, or a hosts-file override that sends only your computer to the new server.
A hosts-file entry looks like this, with your real server IP and domain instead of the examples (on Windows it lives at C:\Windows\System32\drivers\etc\hosts, and on macOS and Linux at /etc/hosts):
203.0.113.10 example.com
203.0.113.10 www.example.com
This test happens only on your own computer. It does not change public DNS or make the new server live for everyone. Remove the entries when you finish. Then check the following:
- The homepage and internal pages load correctly.
- WordPress administrator login works.
- Images, media, menus, and navigation work.
- Plugins and themes load without errors.
- Contact forms submit successfully.
- SSL is configured and HTTPS works.
- No unexpected redirects or PHP errors appear.
For WooCommerce stores, test product pages, the cart, checkout, and payment integration in a test mode so you do not create duplicate live orders. If you need an environment built for stores, see HostElevate WooCommerce hosting.
How to Synchronize Recent Changes in a WordPress Migration
A common mistake is assuming the first database export holds every update made before the DNS switch. It does not, and a WordPress migration that skips this step can lose data. If the original site stays active after your first backup, new content, registrations, comments, form entries, or orders keep landing in the old database.
For a mostly static site, a short final backup and database import may be enough. For an active store or a busy site, use a controlled final synchronization. A safer workflow looks like this:
- Complete the first WordPress migration while the old site stays online.
- Test the new site without letting it take live customer transactions.
- Schedule the final move for a quieter period.
- Pause database-changing activity if necessary.
- Export the latest database from the original server.
- Import it into the new database and verify the data before switching traffic.
High-activity sites may need database replication or another controlled strategy, which should be planned by someone who knows the application and server. If you use a migration service, ask how they handle recent orders and content.
How to Switch DNS Without Interrupting Website Access

Once the new site passes testing and the final synchronization is done, update your DNS to finish the WordPress migration. If DNS is managed separately from your hosting, you may only need to change the A record to the new server IP. If you are changing nameservers, recreate every required record at the new DNS provider first, including A, AAAA, CNAME, MX, SPF, DKIM, DMARC, and subdomain records. Never switch nameservers without checking the existing zone, or you may interrupt email.
The DNS Time to Live (TTL) controls how long resolvers cache a record. Lowering the TTL before a planned move can help the change show sooner, but it does not guarantee instant global propagation. A practical preparation process is:
- Review your current DNS zone and find the website’s A record.
- Check whether the domain uses an external DNS provider.
- Lower the record’s TTL ahead of the switch, where supported.
- Confirm that the new server is ready, then update the record.
- Check the result from several DNS resolvers.
If your site uses a CDN or reverse proxy, configure the new origin server before you change the origin IP. DNS does not copy database content between servers, which is why the final synchronization is separate. Our guide to DNS propagation explains how long changes take and how to check them.
Keep your old hosting account active
Do not cancel the old account right after updating DNS. Some visitors and resolvers keep reaching the old server while caches update, and HostElevate notes that DNS updates can take a few hours to reach everyone. Monitor both servers during the WordPress migration transition, and Google advises shutting the old environment down only when you are confident the move is complete. Its guide to changing your web hosting covers the monitoring steps.
Common WordPress Migration Mistakes to Avoid
Even a straightforward WordPress migration can go wrong through small errors. These are the ones to avoid:
- Forgetting to export the database: files alone leave out content, settings, and user data.
- Changing DNS before testing: visitors may see broken pages, missing images, database errors, or SSL problems.
- Losing new orders or updates: a database backup is out of date the moment new data arrives, so synchronize before the switch.
- Forgetting email DNS records: changing nameservers without recreating MX and related records can interrupt email.
- Cancelling the old account too early: DNS caching means some visitors still reach the old server.
- Ignoring SSL: pages may work while the certificate setup is incomplete, so issue or install the certificate and check HTTPS.
- Skipping compatibility checks: a new server may use a different PHP version or caching setup, so test plugins, themes, forms, and scheduled tasks.
What to Check After a WordPress Migration
After the DNS change, review the site and the hosting environment to confirm the WordPress migration worked. This table covers the main checks:
| Area | What to verify |
| Homepage and pages | Load correctly from the new server with no unexpected 404 errors |
| WordPress login | Administrator access works |
| Database | The latest content and updates are present |
| Media, plugins, themes | Images display and the design and plugins work normally |
| SSL | The HTTPS certificate is valid |
| DNS and email | Records point to the intended services, and mail sends and receives |
| Forms and WooCommerce | Submissions arrive, and cart and checkout work |
| Backups | A fresh backup exists on the new host |
| Logs and Search Console | No unexpected errors, and crawling and indexing stay healthy |
Monitor performance and search visibility
Moving hosts without changing your domain or page URLs does not need a domain-change request in Google Search Console, but you should still watch the site. Check indexing reports, server error logs, response times, Core Web Vitals, important landing pages, and sitemap access. Avoid unrelated URL or permalink changes during the move, so any problem is easier to trace.
If you would rather not handle every step of the WordPress migration yourself, the HostElevate free website migration copies your files, databases, and email to your new account while your current site stays online, tests everything on its servers, and switches your domain at a time you choose. It covers WordPress hosting and WooCommerce sites, and you can contact the HostElevate team to ask how it works for your setup.
Frequently Asked Questions
Can I move my WordPress site to another host without downtime?
Yes, you can avoid noticeable downtime by testing the new server and synchronizing recent data before switching DNS.
How long does a WordPress migration take?
It depends on site size, database complexity, server speed, and method, so there is no fixed time.
Will changing hosting providers affect my Google rankings?
Not when URLs and content stay the same, though crawling or rankings may fluctuate briefly.
Do I need to transfer my domain to the new hosting provider?
No, you can keep the domain with its registrar and only update the required DNS records.
Should I delete my old hosting account after migration?
No, keep it until DNS has fully moved and the new site, database, and email are verified.
Summary:
A WordPress migration without downtime needs careful preparation, a complete backup, and a controlled DNS switch. Prepare the new account, transfer the files and database, test the site privately, and synchronize recent changes before you send visitors to the new server. Pay close attention to dynamic data, DNS records, SSL certificates, and business email.
Keep the old hosting account active until traffic has moved and the new site is verified. If you prefer expert help, a host with a managed WordPress migration service can handle the transfer, testing, and DNS switch with you.