
Cloudflare with cPanel is one of the simplest ways to add a free CDN, faster DNS, and extra security to a website without moving it to another host. Your site, files, and databases stay exactly where they are, while Cloudflare sits in front of your server and handles selected traffic. Done correctly, the setup takes under an hour and needs no coding skills or developer help at all.
This guide shows you how to connect Cloudflare with cPanel hosting, configure the right DNS records, enable SSL, protect email delivery, and fix common errors. You will also learn what to check before changing nameservers, so your website and mailboxes keep working.
Table of Contents
- What Is Cloudflare With cPanel and Why Use It?
- How Cloudflare With cPanel Hosting Works
- What You Need Before Setting Up Cloudflare With cPanel
- How to Set Up Cloudflare With cPanel Hosting
- How to Configure DNS Records for Cloudflare With cPanel
- How to Configure Cloudflare SSL With cPanel
- How to Keep cPanel Email Working With Cloudflare
- How to Test Cloudflare With cPanel After Setup
- Common Cloudflare With cPanel Problems and Fixes
- Is Cloudflare Free Enough for a cPanel Website?
- Frequently Asked Questions
- Summary:
What Is Cloudflare With cPanel and Why Use It?
Cloudflare is a content delivery network (CDN), DNS provider, and website security platform. When you enable its proxy for supported web records, visitors connect to Cloudflare first instead of reaching your hosting server directly. Using Cloudflare with cPanel hosting works with almost any standard account, because Cloudflare does not replace cPanel, your host, or your website files.
Your website keeps running on its existing server. Cloudflare manages DNS and, where proxying is on, selected web traffic. That is why Cloudflare with cPanel is popular with WordPress sites, blogs, stores, and portfolios that want quick wins without a migration.
Key benefits of using Cloudflare with cPanel
- Website security: helps protect proxied traffic against certain malicious requests and DDoS attacks.
- Content delivery: caches eligible static resources and serves them from locations closer to visitors.
- DNS management: manage every record from one dashboard.
- HTTPS support: visitor-facing SSL/TLS, with options to encrypt the connection to your server too.
- Traffic control: set caching, redirects, and selected security rules without touching your cPanel installation.
The free plan is a useful starting point for sites that need basic CDN, DNS, and security features without another subscription.
How Cloudflare With cPanel Hosting Works
Before changing anything, it helps to see how the two services fit together. Your cPanel account stores and runs your website, including files, databases, email accounts, and SSL certificates. Cloudflare manages authoritative DNS in a full setup and can proxy supported web traffic.
The flow looks like this: website visitor → Cloudflare → cPanel hosting server. Cloudflare receives the request for a proxied hostname, applies its caching and security settings, and forwards only the requests that need to reach your origin server. Your cPanel account still processes those requests and serves the content.
Cloudflare DNS versus cPanel DNS
- Cloudflare DNS: becomes the authoritative place to manage your domain’s records.
- cPanel Zone Editor: may still hold records, but edits there do not change public DNS while Cloudflare is authoritative.
- cPanel hosting server: keeps hosting and processing your website.
After switching nameservers, make routine DNS changes inside Cloudflare. Editing the Zone Editor and expecting the live domain to update is a common cause of confusion with Cloudflare with cPanel setups.
What You Need Before Setting Up Cloudflare With cPanel
Prepare the following before you start. Having the right records on hand reduces the risk of downtime during your Cloudflare with cPanel setup.
| Requirement | Why it matters |
| Registered domain | You need control over the domain’s nameservers. |
| Active cPanel hosting | Your website must have a working hosting account. |
| Hosting server IP address | Used to point website DNS records to the origin. |
| Existing DNS records | Needed to recreate website, email, and verification records. |
| Domain registrar access | Required to change nameservers. |
| SSL certificate | Recommended for secure communication with the origin. |
Find your hosting server IP address
Log in to cPanel and look for the General Information panel, usually on the right of the dashboard. Copy the Shared IP Address or Dedicated IP Address, because you need it for the website’s A record in Cloudflare. If you cannot find it, ask your host for the correct address. HostElevate’s web hosting accounts show it in the same place.
Back up your existing DNS records
Before changing nameservers, record what your domain uses today. Pay particular attention to:
- A and AAAA records
- CNAME records
- MX records
- SPF, DKIM, and DMARC records
- Domain verification records
- Custom application or subdomain records
Do not assume Cloudflare’s automatic DNS scan will find every record. Compare the imported list against your existing configuration.
How to Set Up Cloudflare With cPanel Hosting
Follow these steps to connect your cPanel website to the free Cloudflare plan.
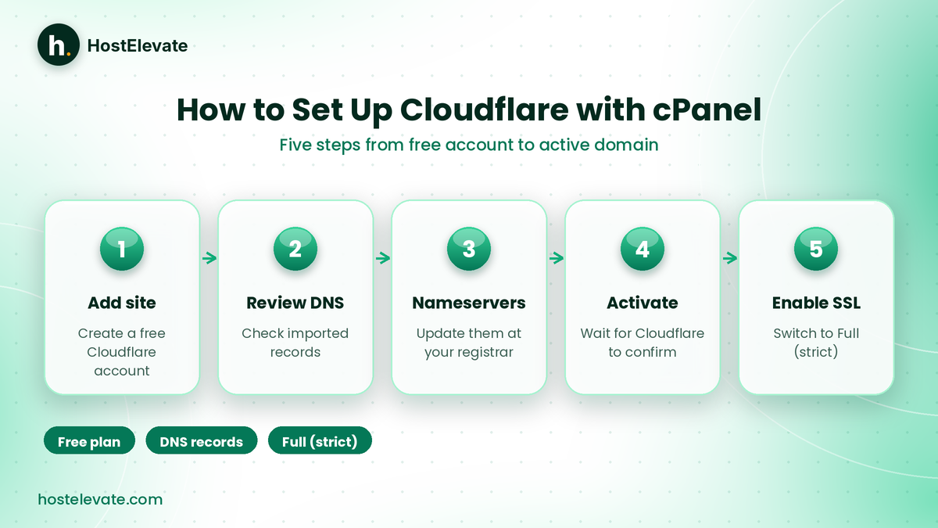
Five steps to set up Cloudflare with cPanel hosting.
Create a free Cloudflare account
Visit Cloudflare and create an account. Then log in, add your domain (for example example.com), continue the setup, and select the Free plan when asked. The free plan is enough for the setup in this guide.
Import and review your DNS records
Cloudflare tries to detect your existing records. Review them carefully and check that the root hostname and www point to the correct server. A typical Cloudflare with cPanel layout looks like this:
| Type | Name | Content | Proxy status |
| A | @ | Your cPanel server IP | Proxied |
| CNAME | www | example.com | Proxied |
| A | Your mail server IP | DNS only | |
| MX | @ | Your mail server hostname | DNS only |
| TXT | @ | Your SPF value | DNS only |
| TXT | _dmarc | Your DMARC value | DNS only |
These are examples, not universal values. Use the records from your hosting and email providers, and add DKIM or service-specific records where required.
Update your domain nameservers
Once your records look right, Cloudflare assigns two nameservers to your domain. Log in to your registrar, open domain management, find the nameserver settings, replace the existing nameservers with Cloudflare’s two, and save. Always copy the exact nameservers shown in your Cloudflare account. If you manage domains with HostElevate, you can register or manage your domain in the same account.
Important: if DNSSEC is enabled at your registrar, follow Cloudflare’s DNSSEC migration steps before changing nameservers. An outdated DS record can cause DNS failures.
Wait for Cloudflare activation
DNS changes take time to reach resolvers. Check your Cloudflare dashboard, and continue only once the domain shows as active. Saving the new nameservers does not mean the setup is finished.
How to Configure DNS Records for Cloudflare With cPanel
DNS is the most important part of Cloudflare with cPanel. A wrong record can take a website offline, interrupt email, or break a subdomain.

Typical DNS records for Cloudflare with cPanel and their proxy status.
Configure the root domain A record
The root domain is usually shown as @. Create an A record named @, enter your cPanel server IP as the IPv4 address, and set the proxy status to Proxied. This sends root-domain web traffic through Cloudflare.
Configure the www record
Visitors should reach your site with or without www. A common choice is a CNAME record named www that targets example.com, set to Proxied. Replace example.com with your domain, or use a separate A record if your hosting setup requires it.
Understand orange cloud and grey cloud

Orange cloud proxies web traffic; grey cloud keeps DNS only.
- Orange cloud (Proxied): supported HTTP and HTTPS traffic passes through Cloudflare, so its CDN and security features apply.
- Grey cloud (DNS only): Cloudflare only answers DNS, and the real destination address is returned directly.
For most standard sites, proxy the root domain and www once you have verified the origin. Do not proxy every record, because email, verification, and other non-web services need their own DNS configuration.
How to Configure Cloudflare SSL With cPanel
SSL matters whether you use shared hosting, WordPress hosting, or a cPanel VPS. Cloudflare encrypts the visitor-to-Cloudflare connection and offers several modes for the link between Cloudflare and your server. HostElevate’s SSL certificates cover the origin side.
Understand Cloudflare SSL modes
| SSL mode | What it does | Recommendation |
| Off | No HTTPS encryption | Avoid |
| Flexible | Encrypts visitor to Cloudflare only | Avoid for secure hosting |
| Full | Encrypts both, no origin certificate validation | Use only when appropriate |
| Full (strict) | Encrypts both and validates the origin certificate | Recommended |
Full (strict) is generally the best choice for Cloudflare with cPanel when your server has a valid certificate for the domain. Read Cloudflare’s SSL/TLS encryption modes guide for the details.
Check your cPanel SSL certificate
In cPanel, go to Security → SSL/TLS Status and confirm that your domain and www hostname have valid certificates. If your host supports AutoSSL, use it to issue and renew them. The cPanel SSL/TLS Status documentation explains each indicator. If a certificate is missing, fix that before enabling Full (strict).
Enable Full (strict) and Always Use HTTPS
- Log in to Cloudflare and select your domain.
- Open SSL/TLS → Overview and select Full (strict).
- Confirm HTTPS works, then open the edge certificate settings.
- Turn on Always Use HTTPS.
Avoid stacking redirect rules at both Cloudflare and the origin server, because conflicting redirects can create loops. If an expired or mismatched origin certificate causes errors, visitors will see SSL warnings until it is fixed.
How to Keep cPanel Email Working With Cloudflare
A common mistake in Cloudflare with cPanel setups is changing DNS records without checking email. Cloudflare’s standard web proxy does not proxy ordinary SMTP, IMAP, or POP3 traffic, so your mail records must stay correct. See Cloudflare’s email DNS records guide for reference.
Keep MX and mail records DNS only
Your MX record names the server that receives your email. Keep the MX record and the mail A record set to DNS only, and use the exact hostname and IP your host provides.
Preserve SPF, DKIM, and DMARC
- SPF: lists the servers allowed to send for your domain.
- DKIM: adds cryptographic signatures that help verify authenticity.
- DMARC: tells receivers how to treat messages that fail checks.
These are TXT records and should not be treated as proxied web records.
Why email may stop after setup
- The MX record points to the wrong mail server.
- The mail hostname uses the wrong IP address or is proxied.
- SPF, DKIM, or DMARC records were not imported.
- A custom email record is missing.
If email lives on the same cPanel server as your site, confirm the mail hostname and MX destination with your host before editing anything. Switching hosts too? HostElevate’s free migration moves files, databases, email, and DNS together.
How to Test Cloudflare With cPanel After Setup
After you finish, test the website and related services instead of assuming everything works. A careful check of Cloudflare with cPanel catches problems before visitors do.
Check your website and DNS
Open both https://example.com and https://www.example.com, and confirm each loads the right site and redirects consistently. Then check records with command-line tools:
- dig example.com A
- dig www.example.com
- dig example.com MX
- dig example.com TXT
A proxied A record returns Cloudflare IP addresses instead of your cPanel server IP. That is expected and does not mean the setup is wrong.
Check SSL and email delivery
- The certificate is valid and covers the hostname.
- No browser security warnings appear.
- The site does not redirect repeatedly.
- A test message sent from your domain arrives.
- A message sent to your domain from outside arrives.
Testing both directions reveals DNS and mail-server issues that a website test alone will miss.
Common Cloudflare With cPanel Problems and Fixes
Even a straightforward Cloudflare with cPanel setup can hit trouble when DNS or SSL settings are off. This table covers the usual suspects.
| Problem | Possible cause | What to check |
| Website not loading | Wrong A record or DNS not active | Cloudflare DNS records and nameservers |
| Error 521 | Origin refuses Cloudflare connections | Server status, firewall, web server |
| Error 522 | Connection timeout to origin | Connectivity, firewall rules, origin response |
| Error 525 | SSL handshake failure | Origin certificate and HTTPS availability |
| Error 526 | Invalid origin certificate in Full (strict) | Certificate validity and hostname |
| Too many redirects | Conflicting HTTPS redirects | Cloudflare and origin redirect rules |
| Email not working | Wrong MX or mail hostname records | Mail records set to DNS only |
| Old version shown | Cached content | Cache settings and purge |
Cloudflare error 521
Error 521 means the origin web server refused the connection. Check that your cPanel server is online and that its firewall allows Cloudflare traffic. If it continues, ask your host to review firewall and web-server logs.
Cloudflare error 522
Error 522 is a timeout between Cloudflare and the origin. Possible causes include server overload, network problems, firewall restrictions, or an unresponsive web server, and your host can investigate resource usage.
Cloudflare error 525 or 526
Both relate to SSL between Cloudflare and the origin. For 525, check that the server can complete the SSL handshake. For 526, confirm the certificate is valid, unexpired, and matches the hostname. Do not switch to Flexible as a permanent workaround for a broken origin certificate.
Is Cloudflare Free Enough for a cPanel Website?
For many websites, the free plan gives a useful set of DNS, CDN, and basic security features. It suits WordPress sites, business sites, blogs, portfolios, and sites on shared cPanel accounts or a cPanel VPS.
However, Cloudflare with cPanel does not replace reliable hosting. Your account still needs enough server resources, a well-configured site, database performance, and backups. It also does not make every site faster automatically, because results depend on content type, caching, origin speed, and visitor locations.
For dependable performance, choose hosting with suitable storage, security, and support. Explore HostElevate web hosting for plans, or WordPress hosting if your site runs on WordPress.
Frequently Asked Questions
Can I use Cloudflare with cPanel hosting?
Yes, you can keep your hosting account and use Cloudflare for DNS, CDN, and supported security features.
Is Cloudflare free for cPanel hosting?
Yes, Cloudflare offers a free plan with DNS and several security and performance features.
Do I need to change my nameservers to Cloudflare?
For a standard full DNS setup, you change your domain’s nameservers at your registrar to the ones Cloudflare assigns.
Which Cloudflare SSL mode works best with cPanel?
Full (strict) is generally recommended when your server has a valid certificate matching your domain.
Will Cloudflare affect my cPanel email accounts?
It does not normally proxy email traffic, but wrong MX, mail hostname, or authentication records can interrupt delivery.
Summary: Cloudflare With cPanel Done Right
Connecting Cloudflare with cPanel lets you use Cloudflare’s DNS, CDN, and security features without moving your site away from its current server. The free plan is a practical starting point for most websites.
The key is correct DNS: verify existing records, point the website to the right server IP, update your nameservers, and keep email records DNS only. Confirm a valid origin certificate before enabling Full (strict), then test your site, HTTPS, DNS, and email. A carefully checked Cloudflare with cPanel setup protects your site without disrupting existing services. To get fast hosting for it, visit HostElevate.