
DNS propagation is the delay between updating a DNS record and seeing that change everywhere. After you edit an IP address, nameserver, or mail record, your website may still open on the old server while email follows outdated settings. This happens because DNS resolvers store cached answers until they expire, so old and new settings can briefly exist side by side across the internet.
This guide explains how long DNS propagation takes, what affects it, and how to check DNS propagation from different locations and with command-line tools. You will also learn how to fix common problems and plan website and email migrations with less downtime, whether you run a personal blog, an online store, or a company website.
Table of Contents
- What Is DNS Propagation, and Why Is It Important?
- How Long Does DNS Propagation Take?
- What Factors Affect DNS Propagation Time?
- How to Check DNS Propagation Worldwide
- How to Check DNS Propagation Using Command-Line Tools
- How to Fix Common DNS Propagation Problems
- How DNS Propagation Affects Website and Email Migrations
- How to Prepare for DNS Changes and Reduce Downtime
- Frequently Asked Questions
- Summary: Check DNS Changes With Confidence
What Is DNS Propagation, and Why Is It Important?
DNS propagation is the period during which updated DNS information becomes visible to different DNS resolvers and users. The Domain Name System (DNS) connects a domain name, such as yourcompany.com, with the records needed to locate websites, mail servers, and other services.
When you change a DNS record, some resolvers fetch the new data quickly, while others keep serving a cached answer until it expires. That is why a website can load correctly on one network and still show the previous server on another.
Understanding the delay matters when you launch a website, move to a new hosting provider, change nameservers, or set up email. Checking DNS propagation helps you separate a normal caching delay from a wrong IP address, a missing record, or a nameserver problem.
How Long Does DNS Propagation Take?
The answer to how long DNS propagation takes depends on the record you changed, its previous Time to Live (TTL), your DNS provider, and how caching resolvers behave.
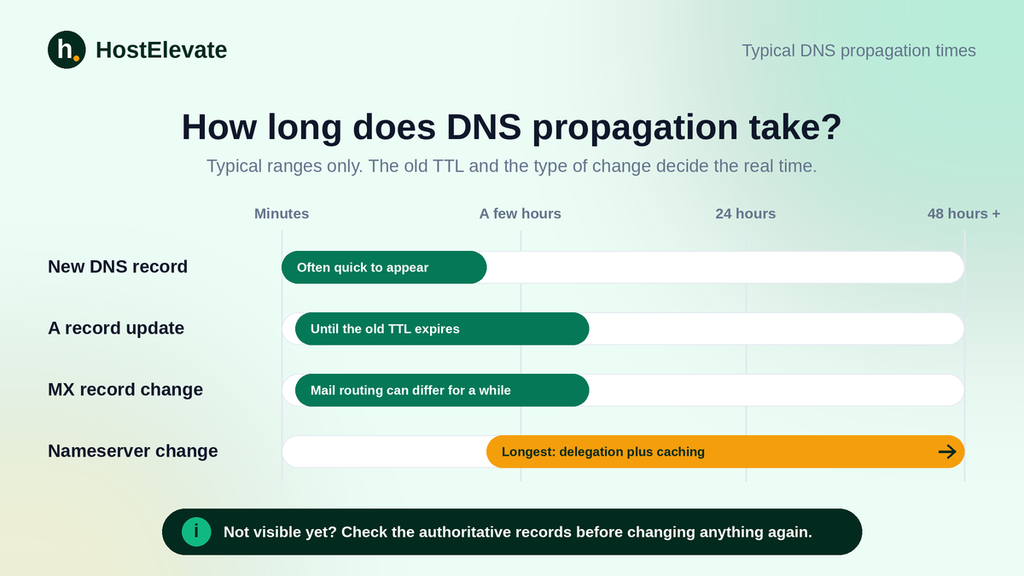
Some DNS changes appear within minutes. Others take several hours, and a few need 24 to 48 hours or longer to show consistently across all networks. There is no single waiting time that applies to every domain or record type.
Many DNS providers publish changes to their own nameservers within minutes, but cached answers elsewhere stay in use until their TTL runs out. Keep these differences in mind:
- Updating an existing A record: Resolvers may keep returning the old IP address until the cached record expires.
- Changing MX records: Incoming email routing can differ for a while as resolvers refresh cached mail server data.
- Changing nameservers: The update also involves your registrar and the domain registry, and delegation records are often cached for up to 48 hours, so it can take longer than a simple record edit.
- Adding a new record: The record may be visible quickly, but a resolver that cached a “record not found” response can still delay it.
Do not assume a change has failed just because it is not visible yet. Check the authoritative DNS records first, then compare answers from several resolvers.
What Factors Affect DNS Propagation Time?
Several technical factors decide when users start receiving your updated DNS information.
Time to Live (TTL)
TTL sets how long a resolver may cache a DNS answer. A record with a TTL of 3,600 seconds can be cached for one hour, although real behavior varies. If a resolver cached the old record shortly before your change, it may keep using that value until its cache expires.
DNS caching
Internet service providers, public DNS resolvers, operating systems, browsers, and local networks can all cache DNS results. These caches do not refresh at the same moment, which is the main reason updates look uneven.
Nameserver changes
Changing the authoritative nameservers for a domain is different from editing a record inside an existing DNS zone. The change must pass through the domain’s delegation, and cached delegation data affects when users see the new setup.
DNS provider configuration
The provider that hosts your DNS zone decides where changes must be made. If your domain uses external DNS, editing records in cPanel may not change the publicly authoritative records.
Local device and network caching
Your own computer or router may keep using a cached result after the wider DNS system has updated. This can make a working change look broken when you test from only one device. You can clear the local cache with these commands:
- Windows: ipconfig /flushdns
- macOS: sudo dscacheutil -flushcache; sudo killall -HUP mDNSResponder
- Linux (systemd-resolved): resolvectl flush-caches
How to Check DNS Propagation Worldwide

A DNS propagation checker compares DNS responses from many locations at once. It is useful when you want to confirm whether a new IP address, nameserver, or email record is visible across different networks.
Choose a DNS propagation checker
Use a reputable tool such as DNSChecker or WhatsMyDNS. Both query DNS records from servers in multiple regions.
Enter your domain and select the record type
Type the hostname you updated, such as yourcompany.com, then pick the record type that matches your change:
- A: IPv4 address for a hostname
- AAAA: IPv6 address for a hostname
- CNAME: Alias that points to another hostname
- MX: Mail server routing
- NS: Authoritative nameserver information
- TXT: Verification, SPF, and other text-based records
Compare the results
Check whether the returned values match the records you meant to publish. If locations return different values, caching or a configuration mismatch may be involved.
Confirm with authoritative DNS
A DNS propagation checker is helpful, but it cannot prove that every resolver worldwide has updated. For a reliable diagnosis, compare the public results with the answers from your domain’s authoritative nameservers.
How to Check DNS Propagation Using Command-Line Tools
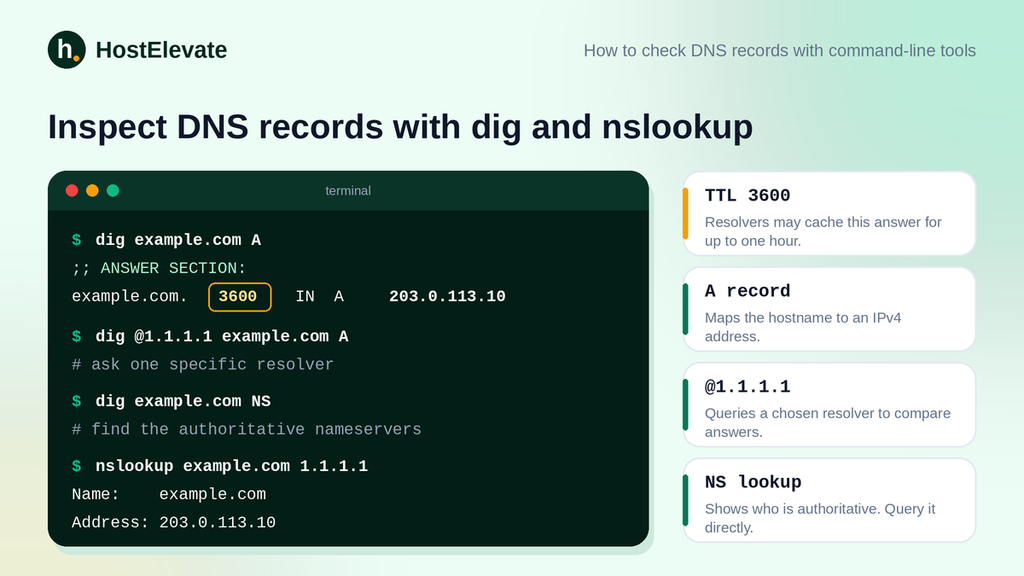
Command-line tools give you a more direct view of DNS records and help you investigate inconsistencies. They are especially useful when you troubleshoot a website migration or a domain that points to the wrong server.
Use nslookup on Windows
Open Command Prompt and run:
nslookup example.com
Replace example.com with your domain. To query a specific resolver, such as Cloudflare’s public DNS, run:
nslookup example.com 1.1.1.1
Use dig on Linux and macOS
Where dig is available, these commands return the main record types:
dig example.com A
dig example.com MX
dig example.com NS
To query a particular resolver, add it with the @ symbol:
dig @1.1.1.1 example.com A
These results show the TTL returned by the resolver. Remember that a recursive resolver may return cached data, so its answer does not always match the current authoritative record.
Query the authoritative nameserver
First find the domain’s authoritative nameservers with the NS query, then ask one of them directly:
dig @ns1.example-dns.com example.com A
Replace the sample nameserver with a real one for your domain. If the authoritative answer is correct, the record is published properly and only cached copies remain to expire.
How to Fix Common DNS Propagation Problems
If DNS results do not match your expected setup, work through these checks before making more changes.
| Problem | What to check |
| Website still opens on the old server | Compare the A or AAAA record with the intended server IP and look for cached responses. |
| Domain does not resolve | Verify nameserver delegation and confirm the required DNS records exist. |
| Email stops arriving after a change | Check MX records and make sure the correct mail service is configured. |
| Some DNS checkers show old values | Compare TTLs, resolvers, and authoritative nameserver responses. |
| cPanel changes do not appear publicly | Confirm whether cPanel manages the domain’s authoritative DNS zone. |
| New record is not visible | Verify the record name, type, value, and authoritative DNS provider. |
Avoid changing the same record again and again while you wait for caches to expire. Each extra change makes troubleshooting harder because different resolvers may hold different versions.
If the authoritative record is wrong, fix it at the DNS provider that actually controls the zone. If it is correct but a resolver still returns an old value, wait for the cache period to end and keep checking.
How DNS Propagation Affects Website and Email Migrations
DNS changes are a critical step when you move a website to a new host. If the domain points to a new server before the files, database, SSL certificate, and application settings are ready, visitors may see errors. If both servers stay active, visitors may temporarily reach different versions of the site.
Email needs extra care. Changing MX records changes where new messages are delivered, and SPF, DKIM, and DMARC records may need to stay in place or be updated when your sending service changes.
Before you make migration changes:
- Verify the website on the new server before you switch the domain.
- Confirm that the SSL certificate and application configuration work. HostElevate provides SSL certificates for this step.
- Check the existing DNS records and write down their values.
- Plan email routing carefully, especially if the domain already has active mailboxes.
- Keep the previous hosting service available until the new setup has been tested.
If you are choosing a host, review HostElevate web hosting plans and the free website migration service, where HostElevate states that your files, databases, email, and DNS records are moved together while your old site stays live until the new one is verified. If you only need to bring a domain over, see how to transfer a domain.
How to Prepare for DNS Changes and Reduce Downtime
Good preparation makes DNS changes easier to manage and lowers the chance of service interruptions.
Review your current DNS records
Save a copy of the A, AAAA, CNAME, MX, TXT, and nameserver records for your services. This gives you a reference if you need to restore the previous configuration.
Plan TTL changes in advance
For a planned migration, lower the TTL well before the change so resolvers have time to pick up the shorter cache lifetime. Lowering the TTL right before an edit does not remove caches that were created under the old TTL.
Verify the new environment
Test the new website, database, SSL certificate, and email setup before you send visitors to the new server. Keep the previous service running during the transition where possible.
Make one controlled change at a time
Record what you changed and when. This makes it easier to tell whether a problem comes from DNS, server configuration, or application settings.
Monitor after the change
Use DNS lookup tools, browser tests, and email tests to confirm everything works. If you run a WordPress site, you can also compare HostElevate WordPress hosting features before you move.
Frequently Asked Questions
How long does DNS propagation take?
It usually takes minutes to a few hours, and sometimes 24 to 48 hours, depending on TTL and caching.
Can I speed up DNS propagation?
You can lower the TTL before a planned change, but you cannot force every resolver to drop its cache.
Why does my website work on one network but not another?
Different DNS resolvers may have cached different answers or refreshed at different times.
Does clearing my browser cache fix DNS propagation?
Not always, because the operating system and network resolver keep their own DNS caches.
How can I tell whether DNS propagation is complete?
Compare authoritative records with several public resolvers, knowing no single checker covers every resolver.
Summary: Check DNS Changes With Confidence
DNS propagation is the process through which updated DNS information becomes visible to resolvers and users. The time it takes depends on TTL values, caching, nameserver delegation, and the type of record you change. Some updates show within minutes, while others take far longer.
To troubleshoot well, verify the authoritative records, compare results from a DNS propagation checker, and use nslookup or dig to inspect responses. Before you change hosting providers or email routing, save your existing records and test the new environment. A structured approach helps you find real configuration errors instead of making needless changes while caches expire. For a guided move, start at HostElevate.